Sunday, December 28, 2008

2008 Minnesota State Fair: Spice Cake


(bottom shelf, right side, red ribbon)
Cakes with Shortening: Spice Cake lot: 2nd place

I started making this cake about 7 years ago, when my dad requested it for his birthday. I entered this category on a whim, and was very pleasantly surprised with the 2nd place ribbon. (The winning cake was made by the Supreme Baker of the Fair, which is the competitor who earns the most points for their entries.) This cake scored very well. The frosting appearance was very smooth, and the layers were even.


Thursday, December 4, 2008

Thanksgiving = Pie Time!

Every Thanksgiving I usually make at least 2 different pies. We were travelling this year, so I needed to make two that would take well to a 14 hour car trip. Apple pie and pecan pie were the clear winners. I will also be entering all three pie categories at the State Fair this year, so I like to get as much practice as I can!

I used pastry and pie recipes from Betty Crocker. (I much prefer the older cookbooks where the pies are in a separate chapter from the cakes, but I digress.) The newer version of the pastry recipe only lists shortening for the fat. If you use lard, use 1/3 cup for a one crust pie and 2/3 cup for a two crust pie.

Better Homes and Gardens is also a good resource for pie recipes.

For the apple pie I like to use Haralson apples. They are plentiful in October in Minnesota, but not much before or after. Luckily, apples keep for a long time in the refrigerator. Remember that fruit will cook down considerably in a pie, so use a lot of apples! I usually use 10 in a pie (8 if I have bigger apples).

I also use more pecans than the pecan pie recipe states - I probably use close to 2 cups. Pecans can get expensive, so look for them on sale. The best bargain for pecans? Fleet Farm! (No joke.)


Yes, I use lard. There's no better way to make a pie crust.


I use a measuring cup that I can push the lard out of and into the bowl. This is great to use for measuring shortening as well.


I use a hand pastry blender to cut the lard into the flour. A good tip is to chill the lard before mixing the crust - it will be flakier with chilled fat.


This is how the pastry dough will look when the lard and flour are blended.


Sprinkle COLD water over the flour mixture and mix with a fork. It will start to come together and off the sides of the bowl.


Form the mixture into a ball.


Getting the pastry cloth ready to roll out the dough. Work the flour into the cloth and rolling pin cover.


As I roll out the crust I rotate my pastry board so it will roll out evenly.


The crust is ready to be laid in the pie pan. Fold the pastry in half, then into quarter. Transfer to pie plate and unfold.


Trim the excess to about an inch from the edge of the pan. Fold the excess pastry under to form a smooth edge. Leave a little extra over the edge of the pan - the pastry will shrink as it bakes.


This is the unbaked pecan pie filling in the shell.


The baked pecan pie!

Two Crust Pies

For a 2 crust pie such as this apple pie, leave about 1/2 inch excess on the bottom crust, fill the shell with the pie filling, then lay the second crust over the filling (fold in quarters again). Trim excess pastry to about 1 inch.


Fold the top crust under the bottom crust to seal the pie crust. (Notice the volume of apples - this will decrease after baking.)


Cut slits in the top crust for steam to escape during baking. Fruit has a high water content, and the water will turn to steam in the oven.


I sprinkle a cinnamon/sugar mixture over the top crust before baking.

The baked apple pie!

Monday, November 10, 2008

Chocolate Emergency

A Chocolate Emergency is a very common ailment, caused by the need for sweets. It can easily be cured with a dessert that is easy to make and does not have to cool completely before consuming. (Incidentally, my college roommate told me she used to know what kind of day I was having if she could smell the brownies baking down the hall when she came home from class.)

These brownies are great for a Chocolate Emergency, as they also have chocolate chips. The amount of chocolate is instantly doubled, which may leave you dazed and engorged, but feeling quite satisfied.


In case you're wondering....I use Hershey's chocolate/cocoa for everything. I like the flavor best out of all the brands I've tried.

I cut the butter into chunks so it melts more evenly in the microwave.


Next I mix all the dry ingredients together in a bowl.


Then I mix in the wet ingredients


Finally, I mix in the chocolate chips.


The only downfall is having to wait the 30 minutes until the brownies are finished baking. By the time they come out of the oven I can only wait for them to cool about 10 minutes before I have to have one. Luckily, brownies are best served warm!

Sunday, November 2, 2008

Cookie Fun this weekend.

I have plans to enter 6 cookie lots at the fair this year, so I need some practice. Cookies are very competitive categories!

I made a batch of chocolate chip cookies and 2 batches of peanut butter cookies with recipes from my Better Homes and Gardens cookbook (1996). I like the results from these recipes, especially the chocolate chip cookies. I'd rather use all butter, but my cookies always brown and spread more than I want them to; now I use half butter, half shortening, and I like the way they turn out much better.

I entered Chocolate Crinkles (Betty Crocker, 1963-1996) in the fair last year in the "Ball cookies, not flattened before baking" lot. Unfortunately, I didn't win a ribbon with those cookies. However, they're still one of Mr. Findlay-Lampkin's favorites. I'm lucky to get a taste of them when he's around. They are almost a cake-like cookie, because of the amount of eggs in them.


When making Chocolate Crinkles, you put a teaspoon of dough in the powdered sugar before forming into a ball.


Make sure to grease the pan with shortening before baking.

The finished cookies! They have a unique look, and are quite delicious!


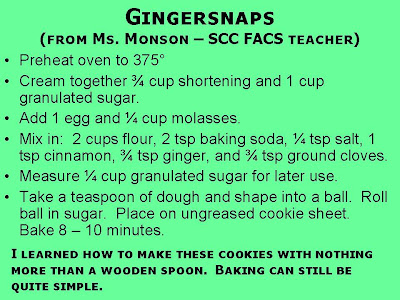
This year I plan to enter the same cookie lot, only with a different cookie. I will make gingersnaps for my ball cookie. This recipe is from my 9th grade Family Enterprise class at SCC. I'm not sure where it's from, but it's a good recipe. Thanks Ms. Monson!

Mixing the molasses into the creamed sugar and shortening.
Adding the spices, soda, and salt. I like using small cups with measurements of these types of ingredients.
The finished dough

Take about a teaspoon of dough and form into a ball. Gingersnaps are not a large cookie.


Roll the ball of dough in the granulated sugar


Place on cookie sheet

The finished cookies! They will also have a cracked appearance, but will flatten during baking.

Sunday, October 26, 2008

Here's an easy dessert - Chocolate Chip Bars

Every once in a while I will stray from the oven to make a dessert. This is one of my favorites that my mom would make when we were kids - Chocolate Chip Bars. She got the recipe from a cookbook she used in a microwave cooking class many years ago. I don't remember the exact name of the cookbook - I think it may have been published by Hotpoint.
I started making these when I was in college - I remember a friend of mine would come over on Wednesday nights to study macroeconomics, and I'd have the bars ready for our study session.
I've made these bars so many times I have the recipe memorized. They are so easy and do not take much time to make. I will start making dinner and put a stick of butter out to soften as I prepare other food. Then after everything else is done, I can whip the bars together.
As an experiment, I tried baking these in the oven once. This recipe is definitely created exclusively for the microwave!


This is how the batter looks when it is spread out in the pan.


Sprinkle the chocolate chips on top.


7 minutes later, you will have chocolate chip bars! They are best when they are served warm. However, I've never been able to wait for them to cool when I eat them!


Sunday, October 19, 2008

My new favorite yeast bread project - Cinnamon Rolls

UPDATE: Here's the recipe I used, from Better Homes and Gardens. I didn't want to post this earlier because I didn't want any students to get confused about the recipe they used in class.

I decided to try my hand at cinnamon rolls this coming year at the fair. The first time I made them they turned out very nicely. The second time I made them, Mr. Findlay-Lampkin requested that half the batch be caramel rolls. After eating them, he requested that all future batches be caramel rolls. Well, I still need to practice for the fair, so I'll still make a few plain rolls. But I like the caramel rolls too, so I made more this time.

St Anthony students might find this interesting - I believe you have your last yeast breads lab this week.


I use a candy thermometer to measure the temperature of the milk so the yeast activates properly.


The dough hook on my Kitchen Aid mixer helps to knead the dough


I hand knead the dough for a minute or two, just enough to make it manageable. Then I put it in a greased bowl to rise.


Punching down the dough after the first rising. After punching down the dough is divided in half.


"Resting" the halves of the dough.


The dough gets rolled out into a rectangle (about the size of a sheet of paper), then brushed with melted butter and sprinkled with a cinnamon/sugar mixture.


Rolling up the dough with the filling.


In order to have well shaped rolls you cannot cut them with a knife. I use a piece of heavy thread, put it under the roll, and pull the ends in opposite directions to slice the rolls.


A slice of the roll.


When I enter the cinnamon rolls in the fair, I plan to bake separately on a cookie sheet, as pictured below.


This will be how my fair entries look.


This morning I made 2 pans of caramel rolls. To start, you spread the caramel mixture in the bottom of a round pans. I sprinkled mine with pecan chips.


Then I place the slices of the roll on top of the caramel.


The rolls rise again. I think I will try to see if I can get 3 pans the next time I make these - this pan is a little crowded!


The rolls after baking. I loosened them along the sides, and inverted the pan onto a plate.


The finished caramel rolls!


I really enjoy making and eating these rolls. I need a whole morning to make them - they take about 2 1/2 hours from start to finish. But you'll never go back to store-bought or a can again!